Nonprofit Guide: How to Set Up a Google Adgrants Account That Doesn’t Get Cancelled 5 Months Later
10-Step Guide Written for Non-Tech Normal People Just Trying to Make a Difference
Google Adgrants is the nonprofit branch of Google Ads. You get up to $10,000 in free online advertising per month, $329 per day. Sounds great right? And it’s admittedly very generous of Google to do this.
Once you learn how to set up a Google Ad Grants account, you’ll be in position to:
- Explode your email list signups
- Increase traffic to your site without having to pay for it
- Grow donations
- Get more volunteers
- Enlarge your impact in the world
But First – Is Your Nonprofit Ready for Google Ad Grants?
If this sounds good to you, then using Google Ad Grants is something you need to strongly consider. But I emphasize the word “consider.” Your nonprofit might not be ready for Ad Grants. And signing up for it before you’re ready almost guarantees you will get your account cancelled by them.
 Why? Because Google made it about 100 times harder to keep an active account due to changes they made in 2018. Here’s an analogy: Before 2018, it was like a high school hurdler. After 2018, it’s like the Incredible Hulk leaping over skyscrapers. And no – I’m not exaggerating.
The main cause of this is that Google requires all Ad Grants accounts to maintain a 5% click through rate (CTR) across their account.
That’s hard. Very hard. But it can be done. However –
If your nonprofit has an outdated website with poor or sparse content, you are not ready for Ad Grants.
If you don’t have the bandwidth or budget to build and maintain an Ad Grants account, you are not ready for Ad Grants. (Minimum time you’ll need: 4 hrs per month)
If you have no understanding of how Google Ads works – you might be ready, but you’ll need some help.
Do not jump into this ocean if you’ve never swam in a pool before.
Setting Up Your Google Ad Grants Account is Easy – NOT TRUE
If you loathe technology that doesn’t work as easily as they keep promising us it does – I am right there with you!
90% of tech help content is worthless, because it’s written by tech people who assume everyone is like them. Plus, they know their products too well, so they omit crucial steps that normal people like you and me will never figure out on our own.
I begin this Google Ad Grants how-to guide in this way because…
This process is a nightmare. I’m not going to sugarcoat it by calling it “easy” or something you can do “in minutes.”
You can’t.
No one can. And anyone who claims otherwise is either lying or has done it so many times they forgot how hard it is. Setting up Ad Grants is a royal pain. It took me hours to figure out and work through all the steps, and I knew a fair amount already before I started.
To set up Google Ad Grants requires:
- Knowledge of how websites work
- Some basic coding awareness (or knowing someone who knows basic coding)
- Understanding how Google Ads accounts are set up and how to manage them (the for-profit side of Google’s advertising)
- Multiple logins and permissions for multiple platforms
So – if after reading this little intro/warning, you think your nonprofit is ready for Google Ad Grants, here’s the best guide I can create to help you set it up.
But even this guide must come with a caveat: There’s no guarantee these links will all continue working, or that these screenshots will always be up to date. The one thing we know for sure about technology is that it will keep changing – assuring us it will never work as well as promised.
Like I said – I’m on your side. Now here’s your guide for how to set up Google Ad Grants.
How to Set Up Your Google Ad Grants Account
Understand what to expect as you get into this. The order of steps you have to go through to successfully sign up for an Ad Grants account is more convoluted than the room numbering system in the high school I taught in.
So bear with me, and don’t expect to implement this all in one day. I recommend bookmarking the page so you can come back to it easily.
 Here’s the overarching path we’re about to take, so you can stay positive as we wind through the mazes to come:
To open an Adgrants account, you must be registered with Google for Nonprofits.
To register with Google for Nonprofits, you must have a “validation token” from Techsoup.
To register with Techsoup, you have to be an ‘eligible nonprofit’.
BUT!!!
To be registered with Google for Nonprofits, you also have to have an Ad Grants account – the very same thing you’re trying to set up. It’s a circle of craziness!
You think I’m joking… but I promise you this is how it really is. So let’s get to step 1.
Step 1: Confirm your nonprofit’s eligibility status
Good news! This first step is relatively simple.
You must confirm two things: 1) That your nonprofit is eligible to use Google Ad Grants, which is mostly dependent on what country you’re in, and 2) That you meet the requirements to receive grants.
To confirm these two items, go to these two pages:
Confirm Eligibility as Nonprofit
Confirm Eligibility for Grants
Be warned: Both these pages tell you all kinds of other “helpful” things if you keep scrolling. But don’t do it!!!
Just make sure you meet the requirements listed, and come back here. Getting lost on all these pages is one reason figuring this out took me hours and hours I’ll never get back. Save yourself the trouble. Go to step 2.
Step 2: Register with Techsoup
What in the world is Techsoup? To be honest, I still don’t know either, and their website is terribly unhelpful at clarifying it. I also don’t know why Google seems to have allied with a random organization to verify that nonprofits are what they say they are. But they did, so here we are.
Your goal at Techsoup is to get your ‘validation token.’ To get that, you must sign up for their membership. It’s free.
But again – be careful about how you sign up, because the page you sign up on says nothing helpful about this (as of this writing).
Specifically, I recommend using an email address that is unique to your nonprofit, but not tied to any one person. So, admin@yournonprofit.org is ideal. This way, someone at your nonprofit will always be able to access the account.
But you can make up names for the rest of this. I used the name Admin Istrator for the first and last name the last time I did this for a nonprofit.
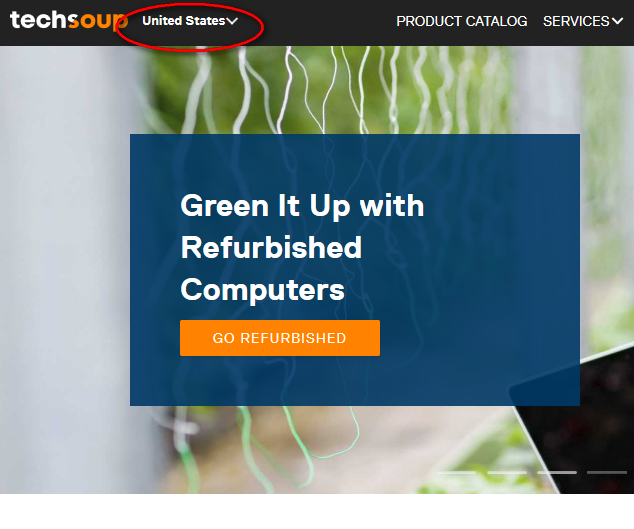
If your nonprofit is based in a country other than the United States, click the drop down at the top left as seen in this screenshot, and the whole site will change to the equivalent one in your country.
Again, the point is to get your validation token.
Step 3: Get Your Validation Token
Techsoup keeps changing their interface, so I’m not going to use a screenshot for this.
But once you’ve registered, you must wait until they approve you. It won’t be instant, so go find something else to do for a while. After they approve you, go to their home page (https://www.techsoup.org/), log in at the upper right hand corner of the site, and you should be able to find your validation token.
This token is what you need to get approved by Google in order to get approved again by Google in order to get approved yet again by Google. See? We’re making progress!
Step 4: Sign Up for ‘Google for Nonprofits’
Here’s where it gets “fun”, if your definition of fun includes wasting gobs of time and getting frustrated. In other words, now we’re at Google.
Go to this page to sign up for Google for Nonprofits
Now, this page is unnecessarily long and has tons of content you can ignore.
Way down at the very bottom of the page is the button to “Get Started.” That’s the one you want. That takes you to a standard-looking Google login screen.
Again – be careful about the email address you use to sign up. I strongly recommend you use a generic email from your nonprofit, because people come and go. You want anyone who works for you to be able to access this account. Use the same one you used for Techsoup, ideally.
To do this, click the “Create Account” link and enter your organizational email address.
Once you log in, you’ll be ready for the next step.
Step 5: Enter your validation token
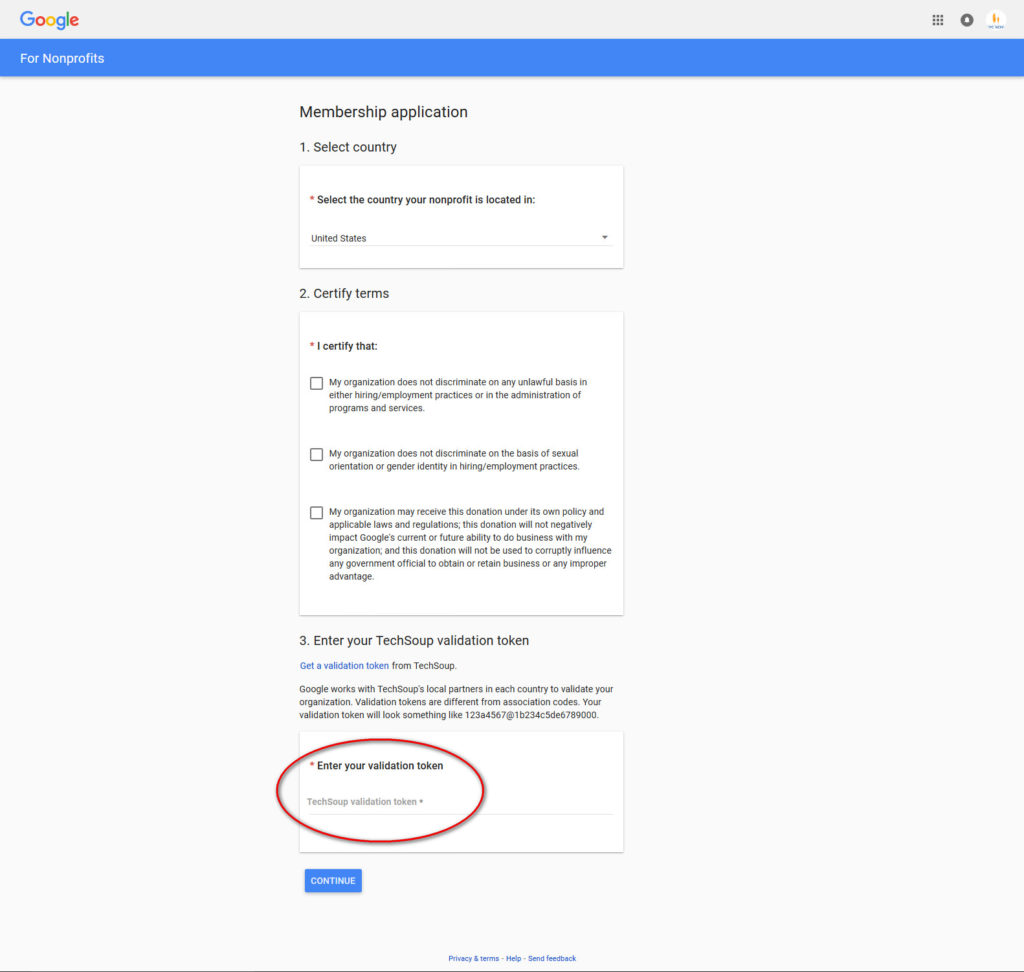
You should see the screen below after logging in to Google for Nonprofits. Again, I sincerely apologize if Google has changed it all again. Please let me know if this is outdated. (And take a screenshot while you’re in there!)
Here is where you get to use your Techsoup validation token. It goes at the bottom.
After clicking “Continue”, you’ll then fill out a few things about your nonprofit, including a brief mission statement.
Please – do NOT spend too much time on this. I know nonprofits can spend eons perfecting their mission statements, but this is not the time or place for that. This isn’t going to show up anywhere in public. Google just wants to know that you exist and that you have an active mission.
I recommend spending less than 2 minutes on this. You’re going to need the time later…
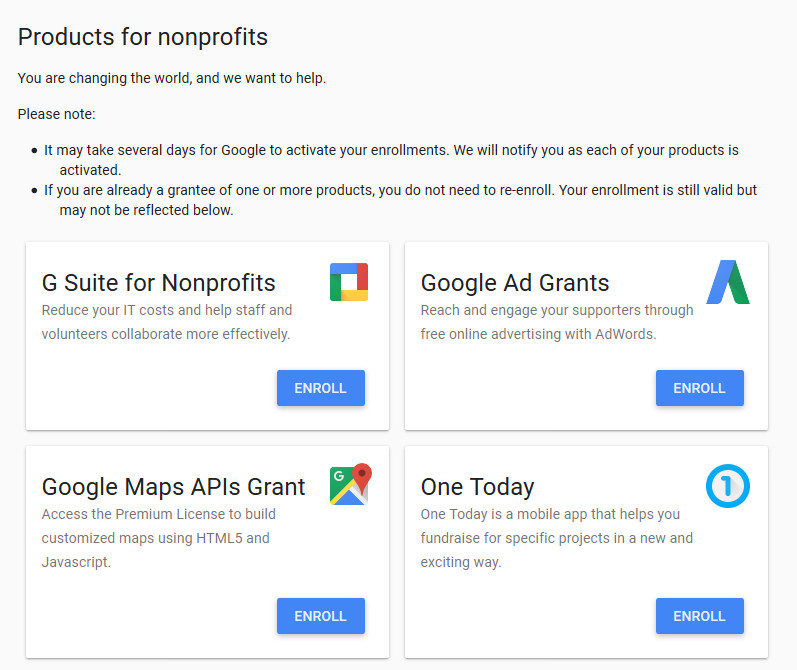
Click ‘Submit’, and then click ‘Go to your account home’, and you should see this screenshot below and be ready for the next step:
Step 6: Sign Up for Google Ads (Google Ad Grants)
Now, in the screenshot above, I never figured out what ‘G Suite for Nonprofits’ is. If you want to fall into a time-sucking black hole, I’m sure that’s a good place to do it. But I recommend just enrolling in Google Ad Grants immediately, and ignoring the other three. Stay focused on the goal!
Now, when you click that Enroll button for Ad Grants, you’ll be taken to a screen showing something like this:
Now, you’re probably feeling pretty good right now. It feels like you’re close to finishing, right?
Wrong.
The craziness has just begun.
First, it asks if you want to use Adwords Express or “Adwords Classic” (again – this may have changed since I took the screenshot. Hopefully you can figure it out from this).
Adwords Express limits your ability to make changes to your account. You’re basically entrusting your ad campaigns to Google. If you don’t feel you’ll have the time or personnel to set it up and manage it yourself, that might be the better option.
Personally, I think you should keep control of your messaging and not relinquish it to robots and scripts developed by people halfway around the world who know nothing about your mission or donors. But that’s me… So I would not choose Adwords Express, but that decision is of course up to you.
Can you change this later? Well, it would be really helpful if Google were to tell us that, right? I never found an answer to this and wasn’t interested in looking further because I recommend against using Express anyway.
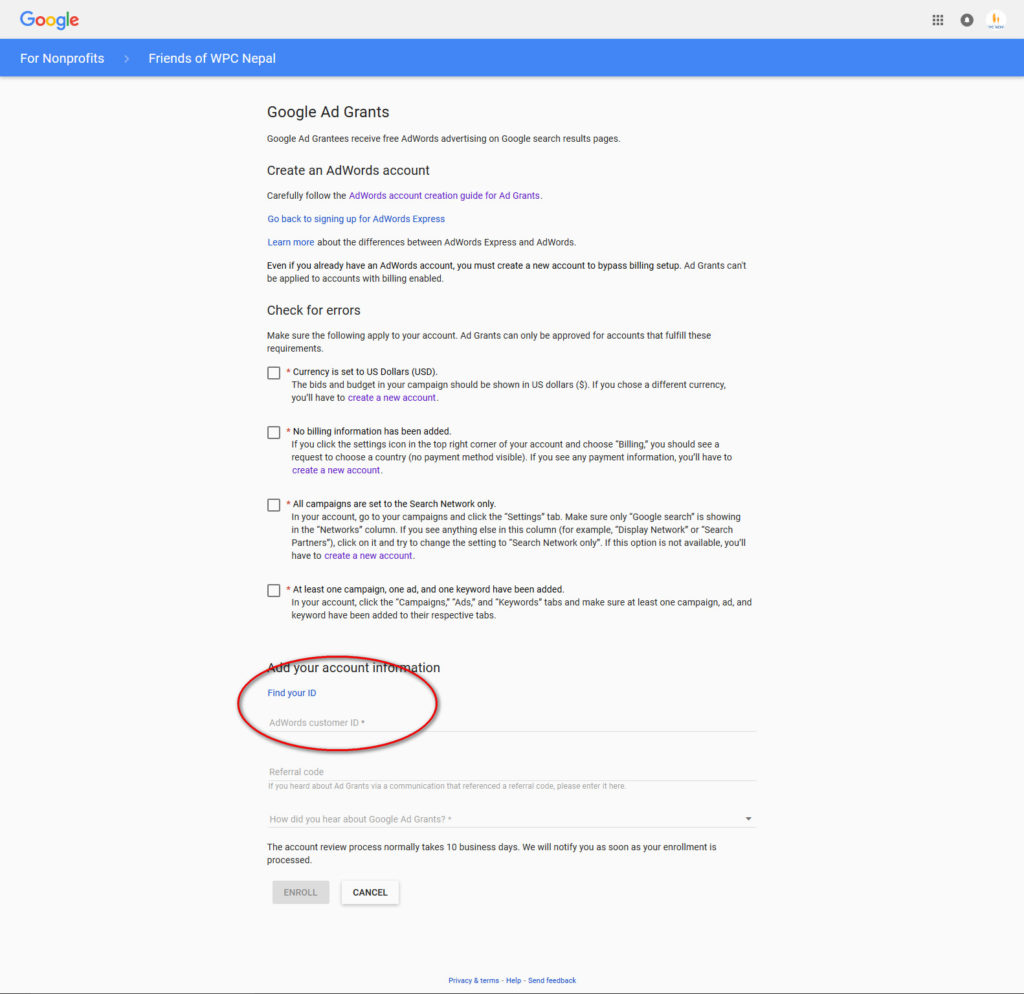
So click the Google Ads version you want (Google Ads is the new name for Adwords), and then look at the fields. Here’s the screenshot:
Notice the circled field – it wants your “Adwords Customer ID”. What’s that?
Well, to get that, you have to go through a whole separate signup procedure.
This is where it gets SCARY. And frustrating.
So, you’re on this screen. But now, you have to leave this screen to go set up your Ad Grants account. I know what you’re thinking: “I thought that’s what I was just about to do.”
As I’ve said before – I’m not being silly when I make statements like this one:
You have to create your Ad Grants account so you can sign up for Ad Grants.
If you said this to Clint Eastwood, he’d probably say, “Are you trying to be funny?” And whatever he did after that wouldn’t go well for you.
Yet, this is what Google is asking of you here. You have to create it before you can sign up for it. Does it make sense to anyone in the real world? No. But apparently it does make sense in some backroom Google laboratory where they concoct all these little tortures.
So we have to leave step 6 for a moment and go to step 6a. This next part is how you will get the Adwords Customer ID that you’ll need to complete step 6.
But BEFORE YOU DO – go up to the URL at the top of the page, and copy and paste it somewhere so you won’t wonder how to get back to this page after completing step 6. It may be a while before you make it back to this screen to enter your Customer ID. (This is that ‘real world’ helpful stuff the tech people never tell you…)
Step 6a: Set Up Your Ad Grants Account – Prepare Before Starting!
This is the Big One.
Go to the VERY IMPORTANT page below – these are Google’s detailed instructions for how to set up your Ad Grants account. This is the most important link or screenshot of this entire how-to guide. (Sure hope Google doesn’t move it!)
https://support.google.com/grants/answer/1689506?hl=en
These instructions are very detailed, and this part will take you some time to complete. Probably at least an hour if it’s your first time. Maybe two. Maybe four. And that’s okay.
To complete it, you need to prepare some things before starting this part, or else you’ll get stuck in the middle and have to leave unfinished, which might mean starting over.
Helping you plan this part would mean helping you set up an entire ad campaign, so I can only do so much here. But here are a few items you will need to know:
- What is the first ad campaign you want to run once Ad Grants is active? (What’s your goal?)
- What page on your website will that ad link to? (VERY IMPORTANT!)
- Do you know some keywords that relate to your campaign?
- Have you written some ads already? (They have specific character limits)
- How do you want to track conversions?
The more of these answers you know in advance, the easier the setup process will be.
Again, this is why if you have zero understanding of how Google Ads works, you’ll have a tough time doing all this on your own. There’s just too much to learn. I did warn you of this at the outset…
If you need help with this part, ProActive Content is available to work with you on it, and can save you gobs of time walking it through with you. And it’s worth it – the donations, awareness, and list growth your nonprofit can achieve from the free ads that await you at the end of this heroic quest are more than worth the sacrifices you’re making now to set it up.
Contact us here and request “Ad Grants setup help”
The first hour is complimentary.
Here’s a 1-Question Pop Quiz to find out if you’ll need outside help once you get inside Google Ad Grants:
Pop Quiz: Do you know the difference between an “ad group” and an “ad campaign.”
If not, you will need help. Ignore this advice at your own risk. You’ve been warned.
So – to begin the creation of your Ad Grants account, click the “Get Started” button on the VERY IMPORTANT link I gave you a moment ago. Here’s the same link again:
https://support.google.com/grants/answer/1689506?hl=en
Step 6b: Continue Setting Up Ad Grants
Once you click “Get Started” on the page linked to above, you can start going through the Ad Grants account creation steps one at a time. Here’s what you’re doing, in a nutshell:
Main Goal: You’re creating your first set of ads.
Creating your first ads is how you sign up. Again, I know it doesn’t make sense to create ads before you sign up for the ad-creation platform, but that’s the process.
To create your ads and go through these steps, you’ll need to know a few things.
- Ad Campaigns and Groups
An Ad Campaign is an overarching category, like a tree trunk. An Ad Group is part of an ad campaign, like the branches. So you’ll have several groups within one campaign – several branches connecting to the trunk.
Here’s an example, because you’re going to be asked to “Name your campaign”.
As you’re going through step 2 on Google’s help page, name your campaign something like “sponsorship,” or “blog traffic”, or “volunteer”, or “donations”. Something fairly broad – related to the goal you want to achieve from this set of ads. This is why I said to know your campaign goals before starting this. You don’t want to figure this out on the fly. Do NOT call it “Campaign A”.
Let’s say you choose Donations for your campaign.
Within that campaign, you might have an Ad Group for recurring donations, and another for seasonal donations. They will likely be more specific to your nonprofit.
The point is – these ad groups will be under the larger category of the Donations campaign. Then, you’ll write ads specific to those groups, possibly sending them to different pages on your website.
Make sense?
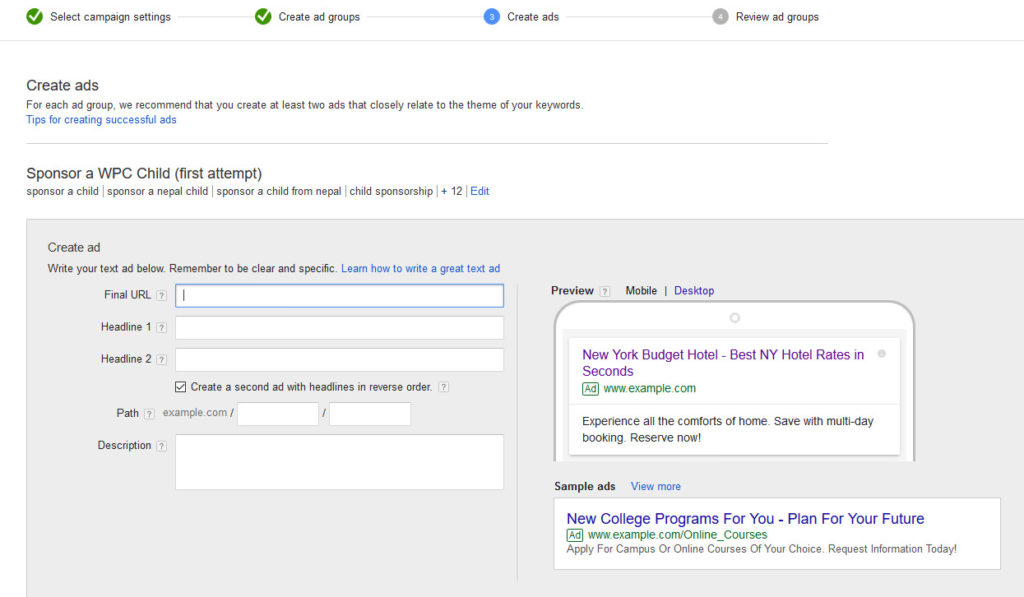
Here’s a screenshot of how the ad-writing page looks. Note the ‘Final URL’ field – that’s where you’ll put the web page URL on your site that your ad will link to. You MUST have a quality web page to link your ads to.
Somewhere in here, you’ll also be asked to enter some keywords. Don’t stress too much about this. Just take some of their suggestions, or do the best you can at listing out some of your own. List them one per line with no commas.
You can come back to this later and add more and delete these. They should relate to the web page your first set of ads is linking to, and you should use some of these keywords in your ads. Again – this part, including your ads, can be changed later.
Following Google’s help page, you should be finishing step 3 now.
Step 4 on their page is about “conversion tracking.” This wasn’t a requirement until 2018, and there are several ways to do it.
I’m making this step 6c because it’s got its own set of procedures.
Step 6c: Set Up Conversion Tracking – Continuing Ad Grants Setup
Continuing to work through Google’s Ad Grants setup page, you are now on step 4 of their page.
They want you to set up conversion tracking.
In short, this means that you will know when people who see your Google Ads have taken actions you want them to take. Actions could be visiting your site, signing up for your newsletter, making a donation, or various other things.
In plain language, conversion tracking tells you how well your stuff is working.
There are several ways to set this up, too much for me to go into here. This part requires some knowledge of code and websites.
Here’s Google’s help page for setting up conversion tracking
And yes, it’s a slog. (I warned you at the outset – this is NOT easy!). But it is helpful to have once it’s done, because you’ll have useful data coming to you that’s far more informative than what you’re used to seeing for your other marketing and fundraising efforts.
Step 7: Finally!
No, you’re not done yet. We’re just finally out of step 6.
Once you finish going through the last step on Google’s Ad Grants help page, you have now created your first set of ads (that you can promptly delete later if you don’t like them, and replace them with something better).
Your account is not active yet, but you can go into it, which you should do now.
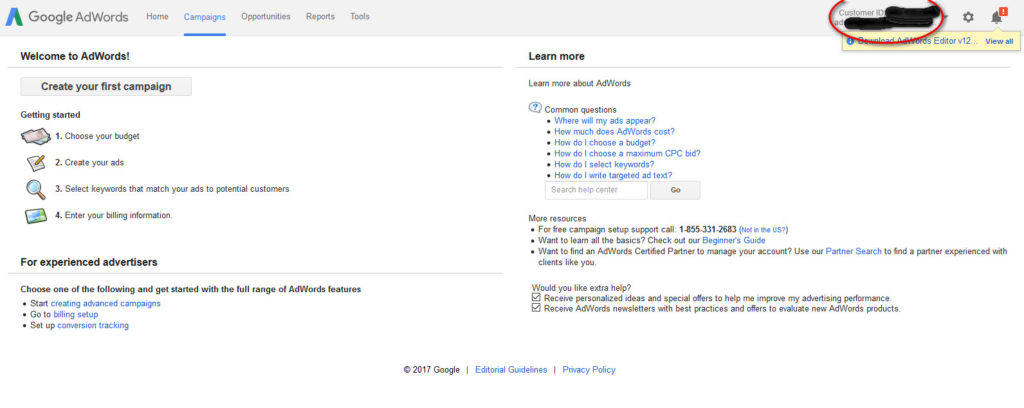
Remember what all this was about? Getting your Adwords Customer ID! Well, now you can get it. It’s in the upper right corner of your Ad Grants account (see screenshot).
(To be clear – your account will not say Ad Grants. It will say Google Ads. The platforms are the same. The accounts are just set up differently).
So now, go back to the URL I told you to copy and paste back in Step 6, the one with the empty space to put your Adwords Customer ID.
Fill that in, then go to step 8.
A Word of Warning. The last time I did this, there was a big scary red button at the top right of the Ad Grants account saying to “Enter your billing information.”
This is a little devil (why it’s red) trying to trick you into destroying all your hard work of the past several hours. Again…not joking…
If you click on this and actually go through the process of filling in your billing information, you will be signing up for a Google Ads PAID ACCOUNT. As a nonprofit, you want a Google Ad Grants account, which will not be billed.
So do NOT enter your billing information, no matter how alluring or scary that big Red Warning is. If you do this, you will have to start all over, from scratch. That’s Google’s warning. I’m just repeating it. Once your account is approved, that button should go away.
Step 8: Finalize your Google for Nonprofits Account
Way back at the beginning of this, which you started reading last year, I made a “joke” that wasn’t really a joke. I said you had to sign up for Google for Nonprofits so you could sign up for Ad Grants so you could sign up for Google for Nonprofits.
Now that you have set up your Ad Grants account and have your Adwords Customer ID, you can return to your Google for Nonprofits account and enter your ID in the appropriate place. This is listed as the last step on the Ad Grants help page you worked through in step 6, so you may have already done this. If so, great. If not, you can do it now.
Then, just sit back and wait. They have to approve your new Ad Grants account. Could take weeks. Hopefully only a couple days though…
Step 9: Improve your website – get some content on there!
While you’re waiting for Google to approve you, start thinking about future campaigns you want to run, and make sure your website has some high quality pages to connect to the ads you want to write next.
Better content could mean many things:
- Blogs that your supporters will want to read
- Helpful pages on how to get involved with your work
- Strong pre-donation pages – not the page with all the fields on it and no copy (though you should always have some copy on these pages!)
- A clarified home page that doesn’t drive people away
So, get your site tuned up a bit so when they approve your Ad Grants account, you can go in and create more ads.
Why am I saying this? Because Google doesn’t like sending people to lousy web pages. They actually factor this in to what’s called your “Quality Score”. No, don’t go look it up. You’re too tired to get into that now. Trust me…
The point is this – having high quality pages on your site makes it more likely Google will show your ads, and more likely that people will click on them. It matters a lot. Here’s the math:
Step 10: Maintain your new Ad Grants account
To preserve your account, Google requires a few things of you:
- Log in to your account at least once a month. If you’re a small nonprofit and very busy and worried you’ll forget, I recommend putting this day on your calendar each month in advance.
- Make at least one set of changes to your account each month. These can be simple like adding and removing keywords, or complex like creating new ads or sitelinks. But make changes once a month. Google wants your account to be active. Otherwise, why are they giving it to you for free?
- Keep your CTR above 5%. Easier said than done, as I made clear at the outset. ProActive Content can help you develop a plan to increase your chances of this. It takes time to implement, but that’s why it works. I have other nonprofits consistently residing above the 5% limit.
Need help with any Ad Grants stuff?
I’d love to help your nonprofit get more traffic, more donations, more subscribers, and more impact. That’s what this is all about, and together we can make it happen. If you want help to set up a Google Ad Grants account, feel free to reach out.

