How to Build Your Nonprofit’s Email List (and Spend $0 on Advertising)
Walk Through This Tried and True 5-Step Email List Building Funnel
Email list building should be one of your nonprofit’s top priorities. If it’s not, talk to your board and show them what I’m about to tell you. Why?
Because email remains the best way to quickly and regularly communicate with donors and supporters. It’s a terrific way to raise lots of money for fairly low expense (much less than direct mail). You can use your email list to tell people about upcoming events, find volunteers, launch social media campaigns, sign online petitions, tell stories – and so much more.
But if your email list has 27 people, it doesn’t do much good.
I had a nonprofit client with about 27 on their list when I got there, and it had produced no donations. They were small and just hadn’t been able to devote attention to it yet. Within a year of implementing what I’m about to show you, their list was over 250 and growing, and donations were coming in – including recurring ones.
And we did it spending not one cent on online advertising. I’ve replicated this approach with other nonprofits. If you follow the process and don’t deviate, it will work every time.
What’s a ‘Marketing Funnel’?
You may already know what I mean by the term ‘marketing funnel.’ If so, you can probably skip ahead to the how-to guide I’m about to show you.
A marketing funnel is a series of steps that move people through a process that meets their need while also fulfilling your goals. You can design all kinds of funnels for all kinds of goals, such as selling products, getting online reviews, getting donations, and yes – building your email list.
The challenge in setting up a list-building funnel is that you need all the pieces in place for it to work. The car can’t drive until it’s fully built.
What you’re about to read is a complete funnel for building a nonprofit’s email list. And to be clear – this ONLY works for nonprofits. Businesses cannot do what you’re about to read.
Doesn’t that make you feel special?
How to Create a Nonprofit Email List-Building Funnel 

One thing before we start. I’m going to show you this funnel from top to bottom. But when you create it, you need to build it from the bottom up. The reason is because each step requires the next step to already be in place before it will work.
So when you actually build this – start at the bottom and work your way back up to Step 1.
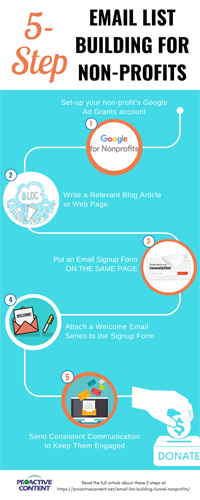
Step 1: Google Ad Grants
The first goal of email list building is to attract people to your website. You do this using Google Ad Grants, which gives nonprofits $10,000 a month in free online ads. Yes, you read that right. $10,000 per month.
While that sounds exciting, there are some complications. The biggest one is that Google now requires nonprofits to average a 5% or higher click-through rate (CTR). 5% is tough to reach consistently, and to succeed at that, you need a well-designed funnel.
That’s why I said to create this funnel from the bottom up. Setting up Ad Grants is the LAST step you will do. But for the general public, these ads are the FIRST thing they will see.
So what makes a ‘well-designed’ funnel that will have a good chance of earning a 5% click-through rate?
The most important factor is Ad Relevance.
If the Google ad is relevant to your target audience and to your website, people will be more likely to click on it. To create that relevance, you need web pages and blogs that speak to what your charity does and the impact it has.
Then you need well-written Google Ads that compel people to click and check out your web page.
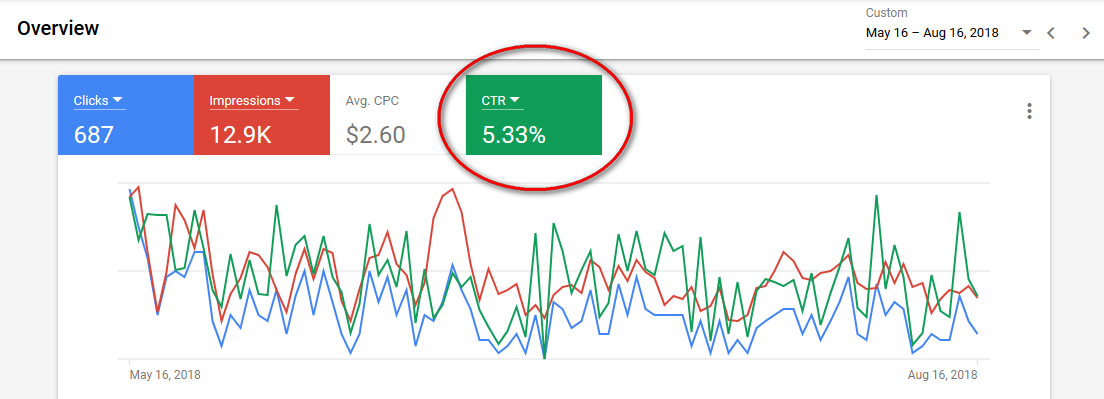
Here’s a screenshot from one of my client’s Google Ad Grants accounts – just to assure you 5% is possible. The green square is the click-through rate, and this is over a 3 month period.
Setting up Google Ad Grants is a lot of work. It’s hard, frustrating, confusing, and time-consuming.
But fortunately, I’ve written a free guide with screenshots to walk you through it. (Though this guide might not be free forever, because it’s quite valuable stuff to just be giving away…)
Learn how to set up your Google Ad Grants account
But remember – this is your last step. Don’t do this until you’ve built out the other steps of your email list building funnel. Otherwise it will implode – and I’m not exaggerating.
Step 2: Write a Relevant Blog Article or Web Page
This is not your home page. If you try to create Ad Grants ads that link to your home page, you’ll have a very tough time hitting the 5% CTR mark.
What has worked for me is to create content-oriented blog articles centered around high-traffic keywords.
Wait, what?
For example, suppose your charity runs hospitals in developing countries. You could write an article about “The Shocking State of Medical Care for Mothers in Uzbekistan.” (To be clear, I know nothing about medical care in Uzbekistan. It’s just an example.)
Now, notice how specific that title is. Medical care. For mothers. In one particular nation.
Why be that specific? Because if someone searches online about ‘health care horror stories,’ but what THEY really want is horror stories from the U.S. health care system, your ad is not going to be relevant to them, because you don’t work in the U.S.
So you need to write articles that are specific to the work your nonprofit does. That way, your article and the ads you write for it will only be relevant to people interested in what your charity does. In other words, you don’t want people interested in U.S. health care. You want people interested in health care in developing nations.
Write articles about that, and put them on your site.
The more specific the article and the more it relates to your audience, the higher your CTR will be.
Step 3: Put an Email Signup Form ON THE SAME PAGE
Every nonprofit (I hope) has some kind of email signup form, somewhere on their site.
The problem is, often those forms are very hard to find. Put yourself in the shoes of a person who just clicked on your ad and came to read your blog:
This is their first time ever on your site. They know almost nothing about you. They might click around your site. They might not.
But if that article intrigues them enough, and if you have an email signup form right there on the same page, then they don’t have to wonder what to do next. If they want to learn more about your work, they can fill out the form and sign up right there, with no confusion or uncertainty.
Now, I used all CAPS for a reason up above. Because some web designers these days hate sidebars, and don’t like “clutter” on web pages. Those designers resist putting signup forms on random pages. But let me be clear if your designer gives you pushback on this:
They’re wrong.
You don’t have to use a sidebar, even though it is the best way to do this. But you do have to put the form on that blog page somewhere that is easy to find. And it must be easy to find on a desktop computer and on a smartphone.
Getting people to do anything online is very difficult, because it’s information overload 100% of the time, and trust is flimsy.
You have to make it easy, simple, and absolutely clear what you want them to do.
The purpose of your blog is not to get traffic to your site.
The purpose of your blog is to get people to sign up for your email list.
Put the email signup form on the blog page so the visitor can easily perform the action you want them to take.
Step 4: Attach a Welcome Email Series to the Signup Form
Almost every nonprofit whose list I’ve signed up for fails at this. But it’s so critically important to email list building.
People are busy. When they sign up for your email list but you don’t communicate with them very soon after, they will forget about you within a week. You want an active list. Not a dead list.
A person who joins your email list is interested in the work you do. This is a “lead” in the marketing world. Leads are your lifeblood. Don’t waste them by having no follow up process!
Create a 3-5 email automated welcome sequence that goes out for a week or two after someone signs up for your email list.
What goes in this email sequence? A lot could be said about that, but focus on these things:
- Congratulate and thank them for signing up (show your appreciation)
- Share a story or two showing the impact they can have
- Be clear about the unmet needs you’re trying to meet
- Tell them a few ways they can get involved
That includes asking for money, but should be more than just that. This is a new subscriber. If they’re motivated enough after a couple emails to give, don’t miss this chance to give them that opportunity. If they just want to keep learning more about you, that’s fine too. They may give later.
Step 5: Send Consistent Communication to Keep Them Engaged
Step five is the ongoing process of donor communication. The new subscriber is now on your email list, and you just need to keep them there.
How often should you be emailing your list? At absolute minimum, once a month. But ideally, more than that.
Find out how many emails you should be sending
What do you do with your email list? What kinds of messages do you send your subscribers? How do you motivate them to start giving?
Here are 7 steps to turning your email list into a reliable source of donations
Need Help Setting Up Any Part of Your Email List-Building Funnel?
There are two parts to doing this:
- Have an email delivery platform such as Constant Contact (a good option for nonprofits – see 7 reasons why Constant Contact is better than Mailchimp)
- Build out the five steps of your email list-building funnel
Reach out to us and we can advise you on strategy and if necessary, produce the content to build out any step of your funnel. Everything from Ad Grants to blogs to emails.
If you need an email system or hate the one you have, you can get 60 days free with Constant Contact. Click the button below to try it out.
Get 60 Days Free